mustard microgreens sprouts

Complete Guide to Growing Mustard Microgreens

The Complete Guide to Growing Mustard Microgreens.

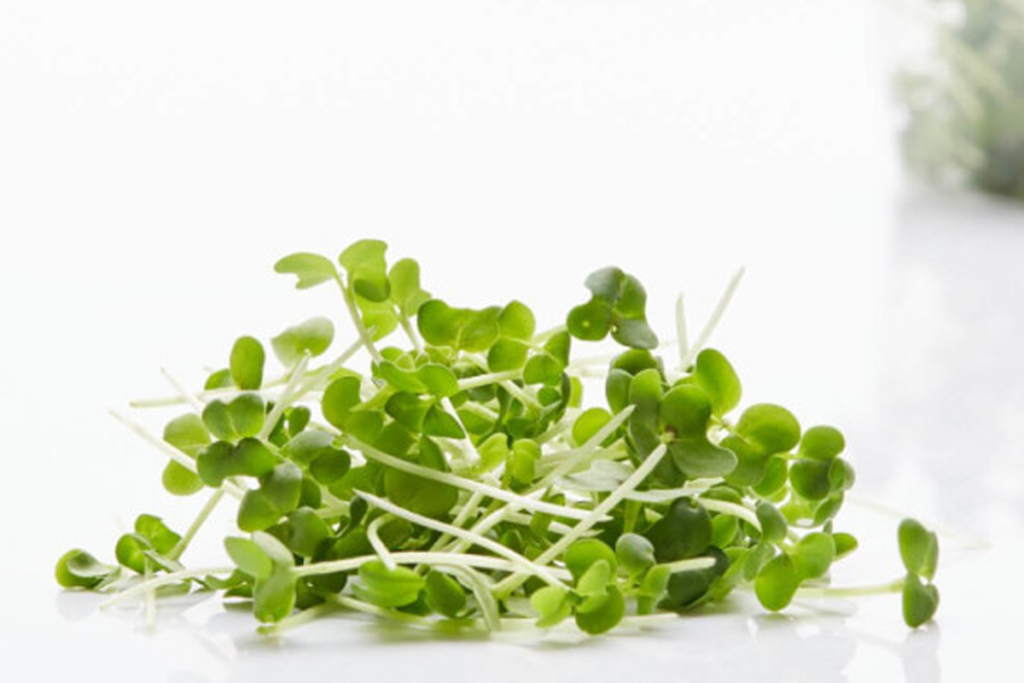
Mustard microgreens are a tasty, spicy and nutritious addition to your dishes. They are quick and easy to grow, making them perfect for beginners or anyone looking to add a spicy flavour to salads, sandwiches, wraps or soups. These microgreens are ready to harvest in just 5-10 days, and their bright green leaves with a hint of purple (depending on the variety) make them visually appealing too. In this guide, we’ll cover everything you need to know to grow mustard microgreens successfully.

Why grow Mustard Microgreens?
Mustard microgreens are not only delicious, they’re also incredibly nutritious. They contain:
– High levels of antioxidants, which help fight free radicals.
– Vitamins A, C and K to support immunity, skin and bones.
– Minerals like calcium, magnesium and potassium.
– A compound called glucosinolate, which gives them a peppery flavour and is thought to have anti-inflammatory and detoxifying properties.
Their fast growth and low maintenance make them a favourite for those who want a quick and healthy crop.

Materials needed

Before you start growing Mustard Microgreens, collect the following materials:
1. Mustard seeds: Choose organic, untreated seeds designed for germination or microgreens. Popular varieties include
   – yellow mustard
   – Red mustard
   – Mizuna mustard
   – Giant Red Mustard (for more intense colour and flavour)
2. Grow tray: A shallow tray (1-2 inches deep) with or without drainage holes. If it does not have drainage holes, you will need to monitor the water level carefully.
3. Growing medium: Use a good quality potting soil, coco coir or seed starting mix. Hydroponic mats may also be suitable.
4. Spray bottle: For spraying seeds and microgreens.
5. Light source: Sunny windowsill or grow lamps that provide constant light.
6. Water: Clean, room temperature water for soaking and misting.
The necessary seeds, supplies, and materials can be purchased on amazon, temu, etsy or at the nearest specialty store.

Step-by-step guide to growing Mustard Microgreens.

Step 1: Prepare your growing tray
– If you are using a tray with drainage holes, place it on top of a second tray to catch any excess water. This will help prevent waterlogging.
– Fill the tray with growing medium (soil, coco coir or hydroponic matting) to a depth of about 1-1.5 inches. Smooth the surface to ensure the seeds are evenly distributed.
– Moisten the growing medium with water so that it is moist but not soggy. Use a spray bottle to avoid saturating the soil.
Although soaking is not necessary for mustard seeds, a short pre-soak will improve germination.
– Place the seeds in a container and soak in cool, clean water for 2-4 hours.
– Drain the water well before sowing.

Step 2: Sow the mustard seeds.

– Measure the seeds: Use as many seeds as you can so that they lie in an even layer on the surface of the soil without overlapping. For a standard 10×10 inch tray, 1-2 tablespoons of mustard seeds will be enough.
– Spread the seeds evenly over the surface of the growing medium. Avoid crowding the seeds as this can lead to uneven growth and mould.
– Mustard seeds are small, so be careful not to overload them.
– Gently press the seeds into the soil with your hands, ensuring good contact with the growing medium. Do not bury the seeds.

Step 3: Cover the seeds.

Mustard seeds germinate best in the dark and under light pressure. This helps their roots to grow stronger.
– Cover the seeds with a light tray or damp paper towel. You can also place a second tray upside down on top of the seeds to block the light and apply a little pressure.
– Place the tray in a cool, dark place (65-75°F or 18-24°C) for 2-3 days. This will allow the seeds to germinate.

Step 4: Check and water daily.

– Check the seeds daily to make sure the growing medium remains moist. If it feels dry, sprinkle it lightly with water.
– Avoid over-watering as this can lead to mould growth. The aim is to maintain a constant humidity level.

Step 5: Expose to light.

After 2-3 days you will notice that the seeds have germinated and small sprouts have appeared.
– Remove the lid and place the tray in a bright place. A sunny windowsill will work well, or you can use LED grow lights for 12-16 hours a day.
– Mustard microgreens will turn green quickly as they absorb light for photosynthesis.

 Step 6: Monitor growth and maintenance.

– Continue to water the microgreens daily to keep the soil moist but not soggy. If your tray has drainage holes, you can water from the bottom by adding water to a second tray.
– If you are using natural sunlight, rotate the tray regularly to ensure even growth.
– Mustard microgreens grow quickly and are usually ready to harvest within 5-10 days. Look for bright green                  leaves and sturdy stems about 2-3 inches tall.

Step 7: Harvesting the Mustard Greens.

When the mustard microgreens are ready to harvest, follow these steps:
– Use sharp scissors or a knife to cut the microgreens just above the soil line.
– Harvest only what you need, or cut all at once and store the rest.
– Gently rinse the harvested microgreens under cold water to remove soil and debris.
– Blot with a paper towel or air dry before use.
How to use and store Mustard Microgreens
– Use: Micro Mustard Greens are versatile and can be added to salads, sandwiches, burgers, soups or as a garnish to any dish that needs a savoury touch.
– Storage: Store harvested greens in the refrigerator in an airtight container lined with a dry paper towel. They will stay fresh for up to 5-7 days.

Common problems and solutions:

  1. Mould or fungus:
   – Ensure proper air circulation by placing the tray in a well-ventilated area.
   – Avoid over-watering and ensure that any excess water drains back into the tray.
  1. Wilted microgreens:
   – Provide adequate light (12-16 hours per day) to prevent stems from becoming too tall and weak.
   – Use grow lights if natural light is insufficient.
  1. Uneven growth:
   – Spread the seeds evenly when planting.
   – If using natural sunlight, rotate the tray so that all parts of the tray receive the same amount of light.
 
Tips for growing mustard microgreens.
– Experiment with varieties: Try growing different types of mustard (yellow, red, mizuna) to explore their unique flavours and colours.
– Use a fan: If you are growing in a humid environment, use a small fan to improve air circulation and prevent mould.
– Don’t overload the seeds: Overlapping seeds can lead to uneven growth and increase the risk of mould.
– Harvest on time: Mustard microgreens can develop a stronger and more bitter flavour if left to grow for too long.

Conclusion:

Mustard microgreens are among the easiest and quickest to grow, making them ideal for beginners and experienced gardeners alike. Their tangy, bitter flavour and incredible health benefits make them a valuable addition to any kitchen. Follow this guide and you’ll be enjoying fresh, tangy mustard greens in just a few minutes. Happy growing!